Monday, June 20, 2016

Advanced query and indexing an array inside an array in Couchbase(or... arrays part 2)

Hi All,

TL;DR- Using indexes is a must, especially when you index an array!

This is a following post to that post about array indexing in Couchbase.
In the previous post I only showed the simple case of an array without any property, or an array without any nested array,
Today we will take it to the next level, Array inside an array (nested array) and properties inside the JSON array.

So take in instance this kind of document:

{
  "name": "Roi",
  "lastName": "Katz",
  "note2": "blahblahblahblahblahblahblahblahblahblahblahblahblahblahblahblahblahblahblahblahblahblah blah",
  "city": "Tel Aviv",
  "note1": "blahblahblahblahblahblahblahblahblahblahblahblahblahblahblahblahblahblahblahblahblahblah blah",
  "age": 50,
  "visited": [
    {
      "country": "UK",
      "cities": [
        "London",
        "Manchester",
        "Coventry"
      ]
    },
    {
      "country": "Israel",
      "cities": [
        "Kfar-Saba",
        "Tel-Aviv",
        "Jerusalem"
      ]
    }
  ]
}

We want to query the countries inside the "visited" property first, and later a city inside the inner JSON array.

So how do we query the Countries inside the array?


select * from people p
where visited is not missing
and any visit in p.visited satisfies visit.country="Israel" end;

Where p is actually the people bucket alias, and visit is a sort of a function on top of the people.
But - while it works we are doing it without an index (except for PrimaryScan), and it going to take a long time to get the results even on a fairly small dataset.
With a dataset of over 100K documents, but only 2 are really relevant it took the query about 2 seconds to run - as it was running on the primary scan.

However, When I do introduce the index, the timings are cut down to 4ms!

The index I used here to speed things up was "countries_indx"


CREATE INDEX countries_indx ON
people(distinct array visit.country for visit in visited end)

Please note again, as it was in my previous post - that "visit" which comes after the for keyword must be the exact same phrase as after the any keyword in the select query.
If they are not - you won't be able to use the index.

Here is a taste of the proper explain plan - from which you can understand the usage of the correct index (countries_indx with IndexScan).


[
  {
    "plan": {
      "#operator": "Sequence",
      "~children": [
        {
          "#operator": "DistinctScan",
          "scan": {
            "#operator": "IndexScan",
            "index": "countries_indx",
            "index_id": "f0dd08732dd1b9a2",
            "keyspace": "people",
            "namespace": "default",
            "spans": [
              {
                "Range": {
                  "High": [
                    "\"Israel\""
                  ],
                  "Inclusion": 3,
                  "Low": [
                    "\"Israel\""
                  ]
                }
              }
            ],
            "using": "gsi"
          }
        },
        {
          "#operator": "Parallel",
          "~child": {
            "#operator": "Sequence",
            "~children": [
              {
                "#operator": "Fetch",
                "as": "p",
                "keyspace": "people",
                "namespace": "default"
              },
              {
                "#operator": "Filter",
                "condition": "(((`p`.`visited`) is not missing) and any `visit` in (`p`.`visited`) satisfies ((`visit`.`country`) = \"Israel\") end)"
              },
              {
                "#operator": "InitialProject",
                "result_terms": [
                  {
                    "expr": "self",
                    "star": true
                  }
                ]
              },
              {
                "#operator": "FinalProject"
              }
            ]
          }
        }
      ]
    },
    "text": "select * from people p\nwhere visited is not missing\nand any visit in p.visited satisfies visit.country=\"Israel\" end;"
  }
]


Now let's continue to the more interesting query,
We want to query for a documents which contains the city of London in their visited property,
how would we do it? by nesting array queries!


select * from people p
where visited is not missing
and any visit in p.visited satisfies 
    any city in visit.cities satisfies city = "London" end 
end;

That query needs a bit more of an explanation.
First we should add the visited is not missing expression in order to filter out every document which doesn't have that property.

Second, we would like to search an array of arrays basically, because of it we would like to do something similar a a nested for loop.
first we looking in the visited property, and afterwards for each part of the outer array we are looking for a property cities and in the cities array for a city named "London".
The visit variable in the outer loop is the same one as in the inner loop for visit.cities.

But as before we still don't have an index for that, which yields a very slow performance roughly 1.8s -2s to execute that query.

When we add the index we are going back to the golden time of ±4ms for the exact same query.
The index is


CREATE INDEX `cities_indx` ON 
people( distinct array 
         ( distinct array city for city in visit.cities  end)
        for `visit` in `visited` end)

Just make sure that city in the index corresponds to the city in the query, and so on for the visit.

if you have a JSON property in each of the cities, you just add in the query "city.yourProperty".


That's all!
Hope you've enjoyed.


Tuesday, May 31, 2016

Shrinking your Couchbase memory footprint with compression

Hi,

TL;DR: Compression will decrease your memory footprint and increase your memory residency.

An important and integral part of Couchbase server many people forget is that Couchbase is not only a fast general use document database with advanced querying of N1QL, it's also is Key/Value store altogether.

If it is the kind of operations you might need, and you can "pay" in terms of be able to get the data by only the key and not be able to index things than you might consider of compressing your JSON or object and save it into binary document in the database instead of just a JSON.

For instance, each bucket contains exactly 1 million documents which looks similar to this one:

Underscores are there in order to guaranty the size of 278 bytes

Each document contains 56 bytes of metadata, about 15 bytes of key size and 278 bytes of value in JSON format. (349bytes per document) - about 349,000,000 bytes of RAM which are 332.8Mb.
We can check the amount of bytes in the memory, of active vbuckets by using the following cbstats command:

./cbstats localhost:11210 -b compressed all | grep active_itm_memory 
vb_active_itm_memory:                        349000000

Compressed document takes about 107-108bytes, so 178,000,000 appx. or 169Mb.
in cbstats:

./cbstats localhost:11210 -b compressed all | grep active_itm_memory 
vb_active_itm_memory:                        178139161

Figures in the following screenshot are slightly different as there is some extra overhead or the Couchbase engine. 
The figures here are the actual volume that the bucket takes in the memory, not only data.


We can see here that the data compressed almost by the factor of 2! (349 vs 178).
meaning - reducing the amount of machines/memory needed by almost 50%.
And if you are not on 100% residence ratio - that method will surely increase it.

So wait! If I need half of the machines (on that use case), where is the catch?

Three things you must note here:
1) As described before, you cannot index compressed documents.
2) Creating the document you want to insert takes more time.
3) Reading the document takes longer as you need to decompress.

Creating the documents time is varying in a factor of 6.
I've used the best compression setting for worst case scenario.
From the tests I've run, the compression factor in gzip lib for Java doesn't really change much for the data in terms of time and footprint.
That machine is my laptop so not a server grade machine.

Uncompressed
Generating 1M documents took: 5002ms

Compressed
Generating 1M documents took: 31731ms

So how do you insert compressed documents?

  1. Create the stream
  2. Wrap it with BinaryDocument
  3. Insert it to Couchbase (observable)
Here is a snip of creating a compressed binary document and adding it to a collection:

ByteArrayOutputStream baos = new ByteArrayOutputStream();
OutputStream gzipOut = new GZIPOutputStream(baos){{def.setLevel(Deflater.BEST_SPEED);}};

ObjectOutputStream objectOut = new ObjectOutputStream(gzipOut);
objectOut.writeObject(doc.content().toString());
objectOut.close();

byte[] bytes = baos.toByteArray();
ByteBuf toWrite = Unpooled.copiedBuffer(bytes);
BinaryDocument binDoc = BinaryDocument.create(key, toWrite);
docsToInsertZipped.add(binDoc);

Observable.from(docsToInsertZipped).flatMap(docBinary->compressedBucket.async().upsert(docBinary)).toBlocking().subscribe();

In order to read the data:
  1. Read (get) the document
  2. Uncompress the content
  3. Convert the byte buffer to string

BinaryDocument binaryDocument = compressedBucket.get("person::0000001",BinaryDocument.clas
byte[] data = new byte[binaryDocument.content().readableBytes()];

binaryDocument.content().readBytes(data);
GZIPInputStream gis = new GZIPInputStream(new ByteArrayInputStream(data));
InputStreamReader reader = new InputStreamReader(gis);
BufferedReader buffered = new BufferedReader(reader);

String read;
while ((read = buffered.readLine()) != null) {
    System.out.println(read);
}


A much more complicated process than just get the document,


JsonDocument document = uncompressedBucket.get("person::0000001");
System.out.println(document.content().toString());

but it is faster, as in that code you don't need to serialize the bytes into JsonDocument.
Take into account that you might have to serialize it anyway, or put it behind wrappers.

That's it.
Now you have another tool you might use in your toolbox.


Tuesday, March 8, 2016

How to index arrays in Couchbase 4.5

Hi,

So you've installed your new shiny Couchbase 4.5 (currently in dev preview stage) and found out that you now can index your favorite array in you JSON document.

But how can you do it?
I am going to demonstrate in the easiest and the quickest way how to achieve that extra crank of speed for you array entries.

I'm going to insert some documents in the following format to the default bucket
{ "name": "Some Name", "cities_traveled":["city1", "city2" ... , "cityN"] }
Next, we going to need to create a simple index for that array of cities,
and Primary index for convenience.

Primary:
create primary index `idx_prime` on `default` using GSI;
Array Index:
create index `idx_traveled` on `default` (distinct array city for city in cities_traveled end) using GSI;
 and try to select our data out using explain to verify we are using our index:
explain select * from `default` d
where any city in d.cities_traveled satisfies city="London" end;
Let's break it up a little:
  • We create our index named idx_traveled on the bucket default, and specifying that we want to iterate on every property inside an array in the property "cities_traveled" distinctly.
  • The first part of the select it's simple, select everything from our bucket, naming it d
  • In the where clause we have stated that we want at least on of our elements in the cities_traveled property to have London string in it.
  • We need to be careful, the "any city" must much to the city definition string of the index - or it won't work.
Good Query

Query
select * from `default` d
where any city in d.cities_traveled satisfies city = "London" end
The "city" after any and in the expression are exactly the same as in the index definition.

Explain

Notice the index that being used is our "idx_traveled" and the operator is IndexScan
 [  
  {  
   "#operator": "Sequence",  
   "~children": [  
    {  
     "#operator": "UnionScan",  
     "scans": [  
      {  
       "#operator": "IndexScan",  
       "index": "idx_traveled",  
       "keyspace": "default",  
       "namespace": "default",  
       "spans": [  
        {  
         "Range": {  
          "High": [  
           "\"London\""  
          ],  
          "Inclusion": 3,  
          "Low": [  
           "\"London\""  
          ]  
         }  
        }  
       ],  
       "using": "gsi"  
      }  
     ]  
    },  
    {  
     "#operator": "Parallel",  
     "~child": {  
      "#operator": "Sequence",  
      "~children": [  
       {  
        "#operator": "Fetch",  
        "as": "d",  
        "keyspace": "default",  
        "namespace": "default"  
       },  
       {  
        "#operator": "Filter",  
        "condition": "any `city` in (`d`.`cities_traveled`) satisfies (`city` = \"London\") end"  
       },  
       {  
        "#operator": "InitialProject",  
        "result_terms": [  
         {  
          "expr": "self",  
          "star": true  
         }  
        ]  
       },  
       {  
        "#operator": "FinalProject"  
       }  
      ]  
     }  
    }  
   ]  
  }  
 ]  

Bad Query

Query
select * from `default` d
where any someCity in d.cities_traveled satisfies someCity = "London" end
The "someCity" after any and in the expression are not the same as in the index definition.

Explain

Notice the index used is idx_prime and the operator is PrimaryScan
 [  
  {  
   "#operator": "Sequence",  
   "~children": [  
    {  
     "#operator": "PrimaryScan",  
     "index": "idx_prime",  
     "keyspace": "default",  
     "namespace": "default",  
     "using": "gsi"  
    },  
    {  
     "#operator": "Parallel",  
     "~child": {  
      "#operator": "Sequence",  
      "~children": [  
       {  
        "#operator": "Fetch",  
        "as": "d",  
        "keyspace": "default",  
        "namespace": "default"  
       },  
       {  
        "#operator": "Filter",  
        "condition": "any `a` in (`d`.`cities_traveled`) satisfies (`a` = \"London\") end"  
       },  
       {  
        "#operator": "InitialProject",  
        "result_terms": [  
         {  
          "expr": "self",  
          "star": true  
         }  
        ]  
       },  
       {  
        "#operator": "FinalProject"  
       }  
      ]  
     }  
    }  
   ]  
  }  
 ]  

Query result:
 <pre style="font-family:arial;font-size:12px;border:1px dashed #CCCCCC;width:99%;height:auto;overflow:auto;background:#f0f0f0;;background-image:URL(https://blogger.googleusercontent.com/img/b/R29vZ2xl/AVvXsEi9jutZy5ae9XOcdQRH4FL-qzq4CK-R6OXA5JylhxXx02qa_BB5c1yR1Bkyou_XDzUiQJWUvpJc4HKO0yMPUdaO8CYo3PfSZZ1kVpMpIFht4zqrvwPbcEfiNr1qZAsowiFo1j1hQ8noG92w/s320/codebg.gif);padding:0px;color:#000000;text-align:left;line-height:20px;"><code style="color:#000000;word-wrap:normal;"> &lt;pre style="font-family:arial;font-size:12px;border:1px dashed #CCCCCC;width:99%;height:auto;overflow:auto;background:#f0f0f0;;background-image:URL(https://blogger.googleusercontent.com/img/b/R29vZ2xl/AVvXsEi9jutZy5ae9XOcdQRH4FL-qzq4CK-R6OXA5JylhxXx02qa_BB5c1yR1Bkyou_XDzUiQJWUvpJc4HKO0yMPUdaO8CYo3PfSZZ1kVpMpIFht4zqrvwPbcEfiNr1qZAsowiFo1j1hQ8noG92w/s320/codebg.gif);padding:0px;color:#000000;text-align:left;line-height:20px;"&gt;&lt;code style="color:#000000;word-wrap:normal;"&gt; [    
  {    
   "d": {    
   "cities_traveled": [    
   "Tel-Aviv",    
   "London",    
   "New-York",    
   "San Francisco",    
   "Los-Angeles"    
   ],    
   "name": "Roi"    
   }    
  },    
  {    
   "d": {    
   "cities_traveled": [    
   "Kilmarnock",    
   "London",    
   "New-York",    
   "San Francisco",    
   "Los-Angeles"    
   ],    
   "name": "Jonny Walker"    
   }    
  }    
  ]    
  &lt;/code&gt;&lt;/pre&gt;   
 </code></pre>  

So that was a brief how-to of array indexes in Couchbase 4.5!
for more information and memory optimized indexes - check the documentation.

Thanks all!
Roi.

Thursday, February 4, 2016

Getting started with Kafka and Couchbase as an endpoint

Hi all,
Couchbase is great as a source for Apache Kafka using the DCP connector.
However it is also great as an endpoint for digesting data, as it is fast, memory first and reliable storage.

In this blog post I will show you how to build simple Java application for a producer and a consumer which save the published messages from Kafka into Couchbase.

I assume here, that you already have a Kafka cluster (even if it's single node cluster).
If not, try to follow that installation guide.

This blog environment have 4 parts:
1. Kafka producer
2. Apache Kafka queue
3. Kafka consumer
4. Couchbase server

Producer

We need the producer in order to submit messages to our queue.
In the queue, those messages are being digested and every application which subscribed to the topic - can read those messages.
The source of our messages will be a dummy JSON file I've created using Mockaroo, which we will split and sent to the queue.

our sample JSON data looks something similar to:
 {   
   "id":1,  
   "gender":"Female",  
   "first_name":"Jane",  
   "last_name":"Holmes",  
   "email":"jholmes0@myspace.com",  
   "ip_address":"230.49.112.20",  
   "city":"Houston"  
 }  

The producer code:
 import com.fasterxml.jackson.databind.JsonNode;  
 import com.fasterxml.jackson.databind.ObjectMapper;  
 import com.fasterxml.jackson.databind.node.ArrayNode;  
 import org.apache.kafka.clients.producer.KafkaProducer;  
 import org.apache.kafka.clients.producer.ProducerConfig;  
 import org.apache.kafka.clients.producer.ProducerRecord;  
 import org.apache.kafka.clients.producer.RecordMetadata;  
   
 import java.io.File;  
 import java.nio.charset.Charset;  
 import java.nio.file.Files;  
 import java.nio.file.Paths;  
 import java.util.ArrayList;  
 import java.util.HashMap;  
 import java.util.List;  
 import java.util.Map;  
 import java.util.concurrent.Future;  
   
   
 public class KafkaSimpleProducer {  
   public static void main(String[] args) throws Exception {  
     Map<String, Object> config = new HashMap<>();  
     config.put(ProducerConfig.BOOTSTRAP_SERVERS_CONFIG, "localhost:9092");  
     config.put("value.serializer", "org.apache.kafka.common.serialization.StringSerializer");  
     config.put("key.serializer", "org.apache.kafka.common.serialization.StringSerializer");  
     KafkaProducer<String, String> producer = new KafkaProducer<String, String>(config);  
   
     File input = new File("sampleJsonData.json");  
     byte[] encoded = Files.readAllBytes(Paths.get(input.getPath()  ));  
   
     String jsons = new String(encoded, Charset.defaultCharset());  
     System.out.println("Splitting file to jsons....");  
   
     List<String> splittedJsons = split(jsons);  

     System.out.println("Converting to JsonDocuments....");  
   
     int docCount = splittedJsons.size();  
   
     System.out.println("Number of documents is: " + docCount );  
   
     System.out.println("Starting sending msg to kafka....");  
     int count = 0;  
     for ( String doc : splittedJsons) {  
       System.out.println("sending msg...." + count);  
       ProducerRecord<String,String> record = new ProducerRecord<>( "couchbaseTopic", doc );  
       Future<RecordMetadata> meta = producer.send(record);  
       System.out.println("msg sent...." + count);  
   
       count++;  
     }  
   
     System.out.println("Total of " + count + " messages sent");  
   
     producer.close();  
   }  

   public static List<String> split(String jsonArray) throws Exception {  
     List<String> splittedJsonElements = new ArrayList<String>();  
     ObjectMapper jsonMapper = new ObjectMapper();  
     JsonNode jsonNode = jsonMapper.readTree(jsonArray);  
   
     if (jsonNode.isArray()) {  
       ArrayNode arrayNode = (ArrayNode) jsonNode;  
       for (int i = 0; i < arrayNode.size(); i++) {  
         JsonNode individualElement = arrayNode.get(i);  
         splittedJsonElements.add(individualElement.toString());  
       }  
     }  
     return splittedJsonElements;  
   }  
 }  


Output from the Producer App

Consumer 

This is a simple one, very straight forward, just get the messages from the queue, and use the Couchbase Java SDK in order to insert documents into Couchbase. For simplicity, I'll be using the sync java SDK, but using the async is totally possible and even recommended.

 import com.couchbase.client.java.Bucket;  
 import com.couchbase.client.java.Cluster;  
 import com.couchbase.client.java.CouchbaseCluster;  
 import com.couchbase.client.java.document.JsonDocument;  
 import com.couchbase.client.java.document.json.JsonObject;  
 import kafka.consumer.Consumer;  
 import kafka.consumer.ConsumerConfig;  
 import kafka.consumer.KafkaStream;  
 import kafka.javaapi.consumer.ConsumerConnector;  
 import kafka.message.MessageAndMetadata;  
   
 import java.util.*;  
   
 public class KafkaSimpleConsumer {  
   public static void main(String[] args) {  
   
     Properties config = new Properties();  
     config.put("zookeeper.connect", "localhost:2181");  
     config.put("zookeeper.connectiontimeout.ms", "10000");  
     config.put("group.id", "default");  
   
     ConsumerConfig consumerConfig = new kafka.consumer.ConsumerConfig(config);  
   
     ConsumerConnector consumerConnector = Consumer.createJavaConsumerConnector(consumerConfig);  
   
     Map<String, Integer> topicCountMap = new HashMap<>();  
     topicCountMap.put("couchbaseTopic", 1);  
   
     Map<String, List<KafkaStream<byte[], byte[]>>> consumerMap = consumerConnector.createMessageStreams(topicCountMap);  
   
     List<KafkaStream<byte[], byte[]>> streams = consumerMap.get("couchbaseTopic");  
   
     List<String> nodes = new ArrayList<>();  
     nodes.add("localhost");  
   
     Cluster cluster = CouchbaseCluster.create(nodes);  
     final Bucket bucket = cluster.openBucket("kafkaExample");  
   
     try {  
       for (final KafkaStream<byte[], byte[]> stream : streams) {  
         for (MessageAndMetadata<byte[], byte[]> msgAndMetaData : stream) {  
           String msg = convertPayloadToString(msgAndMetaData.message());  
           System.out.println(msgAndMetaData.topic() + ": " + msg);  
   
           try {  
             JsonObject doc = JsonObject.fromJson(msg);  
             String id = UUID.randomUUID().toString();  
             bucket.upsert(JsonDocument.create(id, doc));  
           } catch (Exception ex) {  
             System.out.println("Not a json object: " + ex.getMessage());  
           }  
         }  
       }  
     } catch (Exception ex) {  
       System.out.println("EXCEPTION!!!!" + ex.getMessage());  
       cluster.disconnect();  
     }  
   
     cluster.disconnect();  
   }  
   
   private static String convertPayloadToString(final byte[] message) {  
     String string = new String(message);  
     return string;  
   }  
 }  


Output from the Consumer app

Couchbase Server 

Now we can look on the result in Couchbase server.
Look at kafkaExample bucket - Filled with 1000 documents.


Each document looks something like that:


Simple 3 part solution.
Note, that on a Production environment, Producer, Consumer, Kafka or Couchbase will be on or more machines each.

Full (including Maven dependencies) code in GitHub.

Roi.

Sunday, January 3, 2016

Couchbase Mobile - Part 2 - Couchbase lite views (Indexes!)

Hi,

In the part 1 we've built our tiny yet cool application, we've even replicated it to another Couchbase Lite.

But what now? We want to actually use it!
So how do we use a database? well at least with "getting" the data you have couple of options:
1) Get by primary key
2) Get by an index (or "selecting" it where x)

Up until now, in our simple sample app we could only use the "primary key" to access our data and retrieve it.

But it's not the only way to get you data from Couchbase Lite,
In this part we will learn the basics of Couchbase lite indexing. AKA Views.

On the the views, we run our Queries.
So we need to:

1. Create View
2. Run Queries on the view
3. Get the results

We will built our use case - of how using "views" in Couchbase Lite.

1. start a new WPF project.


2. Add Nuget Couchbase.Lite package


3. Copy that XAML

 <Window x:Class="CouchbaseLiteViews_Blog.MainWindow"  
     xmlns="http://schemas.microsoft.com/winfx/2006/xaml/presentation"  
     xmlns:x="http://schemas.microsoft.com/winfx/2006/xaml"  
     xmlns:d="http://schemas.microsoft.com/expression/blend/2008"  
     xmlns:mc="http://schemas.openxmlformats.org/markup-compatibility/2006"  
     xmlns:local="clr-namespace:CouchbaseLiteViews_Blog"  
     mc:Ignorable="d"  
     Title="CouchbaseLite Working with views" Height="285.808" Width="525">  
   <Grid>  
     <Grid.ColumnDefinitions>  
       <ColumnDefinition Width="100"/>  
       <ColumnDefinition Width="*"/>  
     </Grid.ColumnDefinitions>  
     <Grid.RowDefinitions>  
       <RowDefinition Height="*"/>  
       <RowDefinition Height="auto"/>  
     </Grid.RowDefinitions>  
     <StackPanel Grid.Column="0" Grid.Row="0" Margin="0 10 0 0">  
       <Button Content="Insert" Click="InsertDocumentClick" />  
       <Button Content="Read" Click="GetDocumentClick" />  
       <Button Content="InsertSomeData!" Click="InsertSomeDataClick" />  
     </StackPanel>  
     <StackPanel Grid.Column="1" Grid.Row="0" Grid.ColumnSpan="2" Margin="0 10 0 0">  
       <TextBox Text="{Binding DocumentId}" Margin="1"/>  
       <TextBox Text="{Binding DocumentText}" TextWrapping="Wrap" AcceptsReturn="True" Height="190" VerticalScrollBarVisibility="Visible"/>   
     </StackPanel>  
     <StackPanel Grid.Column="0" Grid.Row="1" Grid.ColumnSpan="3" Margin="0 10 0 0" Orientation="Horizontal">  
       <Button Content="GetDocument" Width="100" Margin="1" Click="GetByCityClick"/>  
       <TextBox Text="{Binding City}" Width="100"/>  
     </StackPanel>  
   </Grid>  
 </Window>  

Which translates to
GUI generates form the XAML above

4. After you got the basic UI, which you can explore later (nothing much here really), lets go the the actual code.

After we started all up, and Initialized the Database let us define our views.
In this case I've defined 1 view - just to show how to set things up.

     private void GenerateViews()  
     {  
       var docsByCity = _database.GetView("docs_by_city");  
       docsByCity.SetMap((doc, emit) =>  
       {  
         if (doc.ContainsKey("City"))  
         {  
           emit(doc["City"], doc);  
         }  
       }, "1");  
     }  

What you can see here, that once I retrieve a name from the _database I can define a map on it,
a map is basically a projection and filtering.

In the example above, I've created a view named "docs_by_city",
assigned a delegate, checked if some key ("City") exist and then emitted it to the index.
simple as that.
We've just created our index which for every document contains a property named City - it emits the whole document, you can choose to emit whatever you want, depends on app's requirements.
It can be adjusted for better performance and smaller index size.
Also you can put as your key about any string you would like or compose your index from several properties to target special needs.
It's never good to store the entire document in the index as it basically make a copy of the document inside the index. Try to keep your index as small as possible. But if you happen to need some kind of index which has the entire document as a result, for performance it's better to keep the document in the index instead of accessing the result.Document property - to same some round tripping to the database.
The number "1" here, it the version of the index, During development if you change the map function you also need to increment that number (in case you haven't deleted the whole database), in order to rebuild the index.
There are 2 special queries.
1. Get all documents count. (with _database.DocumentCount)
2. Get all documents. (with _database.CreateAllDocumentsQuery())
After we defined our view (*index) we can start writing the code and use it.

The usage, is fairly simple only 5 steps.
  1. Get the view
  2. Create a query on the view
  3. Define your criteria on the index
  4. Run it
  5. Read it
In code it's look even simpler

     private void GetByCityClick(object sender, RoutedEventArgs e)  
     {  
       var docsByCity = _database.GetView("docs_by_city");  
       var query = docsByCity.CreateQuery();  

       query.StartKey = City;  
       query.EndKey = City;  

       var queryResults = query.Run();  
       MessageBox.Show(string.Format("{0} documents has been retrieved for that query", queryResults.Count));

       if (queryResults.Count == 0) return;  

       var documents = queryResults.Select(result => JsonConvert.SerializeObject(result.Value, Formatting.Indented)).ToArray();  
       var commaSeperaterdDocs = "[" + string.Join(",", documents) + "]";  

       DocumentText = commaSeperaterdDocs;  
     }  

I want the exact "City" so i've written on start and end key the same value.
I run the query and check if there is any results.
Then I "beautify" the result (for every value) and return that as a JSON array.
Please pay attention here that I'm not using result.Document but result.Value, as using the result.Document will not use the index and will go and query the database for each result.
so for performance, please use result.key, result.value or result.DocumentId.
Now just add that part to generate some data...

     private void InsertSomeDataClick(object sender, RoutedEventArgs e)  
     {  
       var result = MessageBox.Show("Press Yes to insert some data (10 docs)!", "Confirm", MessageBoxButton.YesNo);  
       if (result == MessageBoxResult.Yes)  
       {  
         var count = _database.DocumentCount;  
         string[] cities = { "London", "New York", "Tel Aviv" };  
         var rnd = new Random();  
         for (int i = 0; i < 10; i++)  
         {  
           var id = "document" + (i + count);  
           var cityIndex = rnd.Next(0, 3);  
   
           var properties = new Dictionary<string, string>();  
           properties.Add("name", "Roi Katz");  
           properties.Add("City", cities[cityIndex]);  
             
           var doc = JsonConvert.SerializeObject(properties);  
           InsertDocument(id, doc);  
         }   
         MessageBox.Show("10 Records inserted");  
       }  
     }  

And we are good to go!
This is how we do a simple view!
Of course we have more to come on Couchbase lite views, it's just the start.

Of course we do need to create the proper properties,
So for full project, please check my GitHub page.

Roi.


Thursday, December 31, 2015

Setting up Couchbase Server to work with Microsoft Active Directory LDAP

Hi all!

So you want to authenticate users access to Couchbase through your Active Directory LDAP service.

Couchbase has that ability.
You can actually map every user to one of three access permissions levels (as for v4.1)
1. Full Admin
2. Read Only
3. No access

I assume the following:
1.You already have an Active Directory up and running
If not, please refer to here or here for setup instructions.
2. You already have Couchbase already installed (on a Linux Distro)
If not, please refer to those guides: RHEL or Debian

As for v4.1 of Couchbase, only the Linux distros support the LDAP, it's not available on Windows nor MacOS.

My setup here is an Azure Windows server 2012 R2 VM with Active Directory and a local Ubuntu 14.04.3 LTS VM with Couchbase v4.1 installed.


In the setting of your Linux Couchbase you will find a tab called LDAP Auth Setup

To fully understand how the LDAP authentication works with Couchbase,
please read Couchbase's documentation.

So first thing first, install the saslauthd
Pay attention if you are using RHEL or Ubutntu, paths and instructions are a bit different.

TL;DR version in Ubuntu
1. sudo apt-get update
2. sudo apt-get install sasl2-bin
3. sudo nano /etc/default/saslauthd
4. Change START=yes, MECHANISMS="ldap"
5. Save and quit (ctrl+x)
6. switch to sudo (sudo -u)
7. change permission for /var/run/saslauthd and /var/run/saslauthd/mux to 755 so couchbase user can access them.
8. cd to /etc folder
9. if saslauthd.conf does not exist - touch it and add 755 permissions.
10. configure the file as follows:

 ldap_servers: ldap://yourmachineaddress:389  
 ldap_search_base: dc=couchbase,dc=org  
 ldap_filter: (sAMAccountName=%u)  
 ldap_bind_dn: CN=[admin user],CN=Users,DC=couchbase,DC=org  
 ldap_password: [admin password]  
 ldap_auth_method: bind  
 ldap_version: 3  
 ldap_use_sasl: no  
 ldap_restart: yes  
 ldap_deref: no  
 ldap_start_tls: no  

ldap_servers is your AD server
ldap_search_base is on what domain you would like to search users (here it's couchbase.org on AD)
ldap_filter is what you want to return
ldap_bind_dn is a user with admin privileges permissions who can search the AD user tree.
ldap_password the admin user password

11. Open Active Directory ports for LDAP, 389 (TCP+UDP), 3268,3269, 636 (UDP)
12. You can test your active directory connection with JXplorer
13. Restart your salsauthd service - sudo service saslauthd restart
14.  Test it! - sudo -u couchbase /usr/sbin/testsaslauthd -u -p mypassword -f /var/run/saslauthd/mux
15. if you have permissions and set it all up as above you should get a success message.
the username and the password here are the ones you want to check, not the ldap admin.

now let's use it on the Couchbase console!
1. Login to your cluster management console and hit settings -> LDAP Auth setup.
2. Enable LDAP
3. Choose your default behavior - if you don't specify the username anywhere
4. Write down some users or groups in each box
5. Hit save
6. Test it (on the right)
7. If everything is ok - you should get something like "user 'x' has 'Full Admin' access
because I've listed that user under the Full Admin.


8. now sign out and try logging in with the Active Directory Credentials.


If I will get the password wrong - I won't be able to access, as expected.


In case you AD server is unreachable, you would still be able to log in through your regular Couchbase accounts.


Thats all!
Hope you enjoyed.

Roi.


Thursday, December 24, 2015

Couchbase Mobile - Part 1 - Couchbase lite & P2P

Hi all
Couchbase Mobile solution is thrilling innovative and yet fairly simple - it just works!

In this blog we will cover the Couchbase Lite peer-to-peer capabilities, how
you can very easily, to connect two Couchbase Lite databases from two different
devices together using the built in replication.

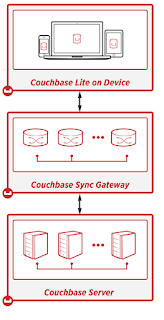
In general the Couchbase's Mobile solution consists of 3 parts,
1) Couchbase Server
2) Sync Gateway
3) Couchbase Lite

Couchbase server holding all the data and can be synced through Sync Gateway to the Embedded Couchbase lite and vice versa.

On this part I will focus on the Couchbase Lite and how to set up P2P replication on .Net platform (but it's pretty much the same on every other platform)

So before we get into some coding, what is Couchbase Lite?
Couchbase lite is an opened-source, embedded document database with built-in abilities of Key/Values store, Indexing (aka Views), and above all - Replication.
Replication is what making that little Database so special.
I can replicate itself to the sync gateway or to any other Couchbase Lite database,
It features security through authentication and segregation of data from one device to another via concept that called channels.

What is replication? as it sounds - duplicate\copy data from one local database to another target, which can be either another local database or the sync gateway.
The API which the replication is using is basically a REST API, which every Couchbase lite is implementing.

So let's build a simple App that replicates data between two peers!
as I said, I've used C# .Net here (don't run away :) ), but the code is actually pretty much the same in Java.
To properly test that project, you might have to use two computers in a network.
but, because we will create the database locally in the folder of the app, a copy to a different location and using separate ports will be ok as well.

First of all, Open Visual Studio 2015 (can be community) as an administrator, In a simple WPF form.

right click on References -> Manage Nuget Packages...

Next, add the Couchbase Lite which is available via nuget package.


Search for Couchbase Lite and install the latest Couchbase.Lite and Couchbase.Lite.Listener.
at the time of the writing of this blog, the latest is 1.1.2.

Once installed, Copy and paste the following code to your MainWindow XAML page.

 <Window x:Class="CouchbaseP2P_Blog.MainWindow"  
     xmlns="http://schemas.microsoft.com/winfx/2006/xaml/presentation"  
     xmlns:x="http://schemas.microsoft.com/winfx/2006/xaml"  
     xmlns:d="http://schemas.microsoft.com/expression/blend/2008"  
     xmlns:mc="http://schemas.openxmlformats.org/markup-compatibility/2006"  
     xmlns:local="clr-namespace:CouchbaseP2P_Blog"  
     mc:Ignorable="d"  
     Title="Couchbase Lite P2P Example" Height="350" Width="525">  
   <Grid>  
     <Grid.ColumnDefinitions>  
       <ColumnDefinition Width="auto"/>  
       <ColumnDefinition Width="100"/>  
       <ColumnDefinition Width="*"/>  
     </Grid.ColumnDefinitions>  
     <Grid.RowDefinitions>  
       <RowDefinition Height="auto"/>  
       <RowDefinition Height="*"/>  
     </Grid.RowDefinitions>  
     <StackPanel Grid.Row="0" Grid.Column="0">  
       <TextBlock Text="Replicate to (address): " Margin="1"/>  
       <TextBlock Text="Replicate to (port): " Margin="1"/>  
       <TextBlock Text="Listen On Port" Margin="1"/>  
       <Button Content="Start Replicating" Click="StartReplcatingClick"/>  
       <Button Content="Start P2P Listener" Click="StartListenerClick"/>  
     </StackPanel>  
     <StackPanel Grid.Row="0" Grid.Column="1">  
       <TextBox Text="{Binding ReplicateToAddress}" />  
       <TextBox Text="{Binding ReplicateToPort}"/>  
       <TextBox Text="{Binding ListenOnPort}"/>  
       <TextBlock Text="{Binding IsReplicating}" Margin="1"/>  
       <TextBlock Text="{Binding IsListening}" Margin="1"/>  
     </StackPanel>  
     <StackPanel Grid.Column="0" Grid.Row="1" Margin="0 10 0 0">  
       <Button Content="Insert" Click="InsertDocumentClick" />  
       <Button Content="Read" Click="GetDocumentClick" />  
     </StackPanel>  
     <StackPanel Grid.Column="1" Grid.Row="1" Grid.ColumnSpan="2" Margin="0 10 0 0">  
       <TextBox Text="{Binding DocumentId}" Margin="1"/>  
       <TextBox Text="{Binding DocumentText}" TextWrapping="Wrap" AcceptsReturn="True" MinHeight="100"/>  
     </StackPanel>  
   </Grid>  
 </Window>  
   

That code above, should look similar to the following output


Next we need to connect the XAML doc to the CodeBehind.
That sample is not MVVM for simplicity - but I did used binding.

First lets initialize the Database and set it to be created locally in our working folder,
We will call that method from the constructor.
Steps are,
  1.  Get the path where you want your database to be created
  2. Create manager with that path
  3. Initialize Database with the manager.
Note: the const DB_NAME in our case will be "sampledb" and it must have all lowercase letter.


     private void InitializeDatabase()  
     {    
        _dbPath = new DirectoryInfo(Environment.CurrentDirectory);  
        _manager = new Manager(_dbPath, ManagerOptions.Default);  
        _database = _manager.GetDatabase(DB_NAME);  
     }  

Add code to start Couchbase Lite Listener
Just create a new listener with the wanted port and the desired database name.

     private void StartListenerClick(object sender, RoutedEventArgs e)  
     {  
       _listener = new CouchbaseLiteTcpListener(_manager, ushort.Parse(ListenOnPort), DB_NAME);  
       _listener.Start();  
       IsListening = "Listening";
     }  
   

And lastly - the code for our replication
Steps are:

  1. Create pull/push replication to address and port
  2. Decide whether you want continuous replication of one time
  3. Start the replication.

     private void StartReplcatingClick(object sender, RoutedEventArgs e)  
     {  
       try  
       {  
         if (_pulls == null) _pulls = new List();  
         if (_pushes == null) _pushes = new List();  
   
         var pull = _database.CreatePullReplication(CreateSyncUri(ReplicateToAddress, int.Parse(ReplicateToPort), DB_NAME));  
         var push = _database.CreatePushReplication(CreateSyncUri(ReplicateToAddress, int.Parse(ReplicateToPort), DB_NAME));  
   
         pull.Continuous = true;  
         push.Continuous = true;  
   
         pull.Start();  
         push.Start();  
   
         _pulls.Add(pull);  
         _pushes.Add(push);  
   
         IsReplicating = "Replicaing!";  
       }  
       catch (Exception ex)  
       {  
         MessageBox.Show(ex.Message);  
       }  
     }  
   
   
     private Uri CreateSyncUri(string hostname, int port, string dbName)  
     {  
       Uri syncUri = null;  
       string scheme = "http";  
   
       try  
       {  
         var uriBuilder = new UriBuilder(scheme, hostname, port, dbName);  
         syncUri = uriBuilder.Uri;  
       }  
       catch (UriFormatException e)  
       {  
         Debug.WriteLine(string.Format("{0}: Cannot create sync uri = {1}", dbName, e.Message));  
       }  
       return syncUri;  
     }  

Lets add a bit of code for Insert and Get

     private void InsertDocumentClick(object sender, RoutedEventArgs e)  
     {  
       if (string.IsNullOrWhiteSpace(DocumentId))  
       {  
         MessageBox.Show("Please specify ID");  
         return;  
       }  
   
       var document = _database.GetDocument(DocumentId);  
   
       var properties = JsonConvert.DeserializeObject<Dictionary<string, object>>(DocumentText);  
       var revision = document.PutProperties(properties);  
   
     }  
   
     private void GetDocumentClick(object sender, RoutedEventArgs e)  
     {  
       var doc = _database.GetDocument(DocumentId);  
   
       DocumentText = JsonConvert.SerializeObject(doc.Properties, Formatting.Indented);  
     }  

All we have to do now is to connect all the bindings you see in the XAML page and to implement INotifyPropertyChanged

Here is the full Code Behind
The full project can be found on Github

Now, in order to use it and test your replication, follow the following steps:

  1. Copy your executable folder to 2 different folders (i.e. Client1 and Client2)
  2. Start both clients under Administrator privileges
  3. Configure Client1 listening Port as 49840
  4. Configure Client2 listening Port as 49841
  5. Configure Client1 replication address to localhost and port 49841
  6. Configure Client2 replication address to localhost and port 49840
  7. Once it started replicating, Add a sample JSON with an ID on Client1 and test it on Client2
    and vice versa.


That's all!
We've built our first Couchbase lite replication in c# without all the fuss and hard work of the replication logic!

Next time - A bit more of Coucbase lite replications and deep dive into views.

Please check API, and quickstarts here

Merry xmas!
Roi.