Hi all
Couchbase Mobile solution is thrilling innovative and yet fairly simple - it just works!
In this blog we will cover the Couchbase Lite peer-to-peer capabilities, how
you can very easily, to connect two Couchbase Lite databases from two different
devices together using the built in replication.
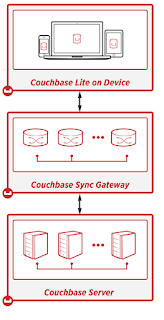
In general the
Couchbase's Mobile solution consists of 3 parts,
1)
Couchbase Server
2)
Sync Gateway
3)
Couchbase Lite
Couchbase server holding all the data and can be synced through Sync Gateway to the Embedded Couchbase lite and vice versa.
On this part I will focus on the Couchbase Lite and how to set up P2P replication on .Net platform (but it's pretty much the same on every other platform)
So before we get into some coding, what is Couchbase Lite?
Couchbase lite is an
opened-source, embedded document database with built-in abilities of Key/Values store, Indexing (aka Views), and above all - Replication.
Replication is what making that little Database so special.
I can replicate itself to the sync gateway or to any other Couchbase Lite database,
It features security through authentication and segregation of data from one device to another via concept that called channels.
What is replication? as it sounds - duplicate\copy data from one local database to another target, which can be either another local database or the sync gateway.
The API which the replication is using is basically a REST API, which every Couchbase lite is implementing.
So let's build a simple App that replicates data between two peers!
as I said, I've used C# .Net here (don't run away :) ), but the code is actually pretty much the same in Java.
To properly test that project, you might have to use two computers in a network.
but, because we will create the database locally in the folder of the app, a copy to a different location and using separate ports will be ok as well.
First of all, Open Visual Studio 2015 (can be community) as an administrator, In a simple WPF form.
right click on References -> Manage Nuget Packages...
Next, add the Couchbase Lite which is available via nuget package.
Search for Couchbase Lite and install the latest Couchbase.Lite and Couchbase.Lite.Listener.
at the time of the writing of this blog, the latest is 1.1.2.
Once installed, Copy and paste the following code to your MainWindow XAML page.
 <Window x:Class="CouchbaseP2P_Blog.MainWindow"
     xmlns="http://schemas.microsoft.com/winfx/2006/xaml/presentation"
     xmlns:x="http://schemas.microsoft.com/winfx/2006/xaml"
     xmlns:d="http://schemas.microsoft.com/expression/blend/2008"
     xmlns:mc="http://schemas.openxmlformats.org/markup-compatibility/2006"
     xmlns:local="clr-namespace:CouchbaseP2P_Blog"
     mc:Ignorable="d"
     Title="Couchbase Lite P2P Example" Height="350" Width="525">
   <Grid>
     <Grid.ColumnDefinitions>
       <ColumnDefinition Width="auto"/>
       <ColumnDefinition Width="100"/>
       <ColumnDefinition Width="*"/>
     </Grid.ColumnDefinitions>
     <Grid.RowDefinitions>
       <RowDefinition Height="auto"/>
       <RowDefinition Height="*"/>
     </Grid.RowDefinitions>
     <StackPanel Grid.Row="0" Grid.Column="0">
       <TextBlock Text="Replicate to (address): " Margin="1"/>
       <TextBlock Text="Replicate to (port): " Margin="1"/>
       <TextBlock Text="Listen On Port" Margin="1"/>
       <Button Content="Start Replicating" Click="StartReplcatingClick"/>
       <Button Content="Start P2P Listener" Click="StartListenerClick"/>
     </StackPanel>
     <StackPanel Grid.Row="0" Grid.Column="1">
       <TextBox Text="{Binding ReplicateToAddress}" />
       <TextBox Text="{Binding ReplicateToPort}"/>
       <TextBox Text="{Binding ListenOnPort}"/>
       <TextBlock Text="{Binding IsReplicating}" Margin="1"/>
       <TextBlock Text="{Binding IsListening}" Margin="1"/>
     </StackPanel>
     <StackPanel Grid.Column="0" Grid.Row="1" Margin="0 10 0 0">
       <Button Content="Insert" Click="InsertDocumentClick" />
       <Button Content="Read" Click="GetDocumentClick" />
     </StackPanel>
     <StackPanel Grid.Column="1" Grid.Row="1" Grid.ColumnSpan="2" Margin="0 10 0 0">
       <TextBox Text="{Binding DocumentId}" Margin="1"/>
       <TextBox Text="{Binding DocumentText}" TextWrapping="Wrap" AcceptsReturn="True" MinHeight="100"/>
     </StackPanel>
   </Grid>
 </Window>
That code above, should look similar to the following output
Next we need to connect the XAML doc to the CodeBehind.
That sample is not MVVM for simplicity - but I did used binding.
First lets initialize the Database and set it to be created locally in our working folder,
We will call that method from the constructor.
Steps are,
- Get the path where you want your database to be created
- Create manager with that path
- Initialize Database with the manager.
Note: the const DB_NAME in our case will be "sampledb" and it must have all lowercase letter.
     private void InitializeDatabase()
     {
        _dbPath = new DirectoryInfo(Environment.CurrentDirectory);
        _manager = new Manager(_dbPath, ManagerOptions.Default);
        _database = _manager.GetDatabase(DB_NAME);
     }
Add code to start Couchbase Lite Listener
Just create a new listener with the wanted port and the desired database name.
     private void StartListenerClick(object sender, RoutedEventArgs e)
     {
       _listener = new CouchbaseLiteTcpListener(_manager, ushort.Parse(ListenOnPort), DB_NAME);
       _listener.Start();
       IsListening = "Listening";
     }
And lastly - the code for our replication
Steps are:
- Create pull/push replication to address and port
- Decide whether you want continuous replication of one time
- Start the replication.
     private void StartReplcatingClick(object sender, RoutedEventArgs e)
     {
       try
       {
         if (_pulls == null) _pulls = new List();
         if (_pushes == null) _pushes = new List();

         var pull = _database.CreatePullReplication(CreateSyncUri(ReplicateToAddress, int.Parse(ReplicateToPort), DB_NAME));
         var push = _database.CreatePushReplication(CreateSyncUri(ReplicateToAddress, int.Parse(ReplicateToPort), DB_NAME));

         pull.Continuous = true;
         push.Continuous = true;

         pull.Start();
         push.Start();

         _pulls.Add(pull);
         _pushes.Add(push);

         IsReplicating = "Replicaing!";
       }
       catch (Exception ex)
       {
         MessageBox.Show(ex.Message);
       }
     }


     private Uri CreateSyncUri(string hostname, int port, string dbName)
     {
       Uri syncUri = null;
       string scheme = "http";

       try
       {
         var uriBuilder = new UriBuilder(scheme, hostname, port, dbName);
         syncUri = uriBuilder.Uri;
       }
       catch (UriFormatException e)
       {
         Debug.WriteLine(string.Format("{0}: Cannot create sync uri = {1}", dbName, e.Message));
       }
       return syncUri;
     }
Lets add a bit of code for Insert and Get
     private void InsertDocumentClick(object sender, RoutedEventArgs e)
     {
       if (string.IsNullOrWhiteSpace(DocumentId))
       {
         MessageBox.Show("Please specify ID");
         return;
       }

       var document = _database.GetDocument(DocumentId);

       var properties = JsonConvert.DeserializeObject<Dictionary<string, object>>(DocumentText);
       var revision = document.PutProperties(properties);

     }

     private void GetDocumentClick(object sender, RoutedEventArgs e)
     {
       var doc = _database.GetDocument(DocumentId);

       DocumentText = JsonConvert.SerializeObject(doc.Properties, Formatting.Indented);
     }
All we have to do now is to connect all the bindings you see in the XAML page and to implement INotifyPropertyChanged
Here is the
full Code Behind
The full project can be found on
Github
Now, in order to use it and test your replication, follow the following steps:
- Copy your executable folder to 2 different folders (i.e. Client1 and Client2)
- Start both clients under Administrator privileges
- Configure Client1 listening Port as 49840
- Configure Client2 listening Port as 49841
- Configure Client1 replication address to localhost and port 49841
- Configure Client2 replication address to localhost and port 49840
- Once it started replicating, Add a sample JSON with an ID on Client1 and test it on Client2
and vice versa.
That's all!
We've built our first Couchbase lite replication in c# without all the fuss and hard work of the replication logic!
Next time - A bit more of Coucbase lite replications and deep dive into views.
Please check API, and quickstarts
here
Merry xmas!
Roi.


